Baking Sourdough Bread
Hello Folks! Today we started a new project, which is baking sourdough bread. However, we are using a special method, we will be using the yeast that grows in grapes to make the sourdough bread starter. We are using this method to demonstrate how hundreds of years ago people baked their bread. During this time there was no electricity and no refrigerator, consequently a lot less commodities that we have now. Our mission is to use a similar recipe to the one that was probably used in the good ol' days to make a delicious sourdough bread with yeast coming from grapes. To do this we will use the process of fermentation, meaning that the yeast will come from the grape's fermented juices. The process to create the starter will last 14 days and then 2 days to bake, a long time I know, but believe us, it is worth it. We will be adding posts to our blog every week to update you with the recipe. Let's begin the journey!!!
Recipe
Ingredients
2 Cups of water
2 Cups of flour
A large bowl
Cheesecloth
500 grams of red unwashed grapes
Plastic wrap
Procedure
Sunday November 10, 2013.
Day 1
1. Put the unwashed grapes on a double layer of cheesecloth and enclose it so that it forms a bag. Don't wash the grapes!! It is necessary that they stay dirty, although we don't know for what reasons.

2. In the bowl, add the water and flour and mix thoroughly with a spatula. Crush the grapes lightly to create juice.

3. Place the bag of grapes into the bowl with the mix and stir it carefully. This will allow the grape juice to flow into the mix.


4. Cover the bowl with a plastic wrap so that the gases don't escape. This is were the fermentation process starts, and it will be lasting a few more days.

We will adding more posts, so keep in touch!
Monday November 11, 2013.
Day 2
The starter has changed a little since day 1, the mix is a little bit more solid and less soupy. It has some bubbles, product of the fermentation, and looks a little more white than it did yesterday. However, its smell has worsened, it smells like garbage. Hope that doesn't mean anything is wrong!!

Tuesday November 12, 2013.
Day 3
The starter has more and smaller bubbles than before and it is more inflated in some places. More condensation has formed on the inner walls of the bowl. Aaaaand it smells HORRIBLE. I mean it, wear a mask if you must, or die.

Wednesday November 13, 2013.
Day 4
The starter is more solid than the day before, and condensation formed on the plastic cover. A cup of water and flour were added and the starter became sloppier. Mixing the added water and flour was one of our most repulsive experiences we ever lived in our lives. We were gagging all the way. WHAT FUN! (sarcasm detected). Note that some of the added flour is a little bloated, so mix it well.
Before adding water and flour:

After adding water and flour:

Thursday November 14, 2013.
Day 5
The starter has more bubbles than before and has a liquid layer on top of a more solid layer. There are no more flour bloats in the starter since it was mixed thoroughly, and the texture is somewhat smoother. It still smells horrible, it smells worse than garbage!! The bad smell happens because the grapes in the starter are fermenting. There is a little bit of condensation in the walls of the layer and on the plastic cover, due to the fermentation gases.

Friday November 15, 2013.
Day 6
At the beginning of the day, the outermost layer of the bread was completely flat, without any bubbles. Then, in the afternoon some bubbles started to emerge and they started surrounding the dishcloth. At the end of the day it was completely bubbly, and a there seen two layers. The first layer was very tiny, barely seen, it was kind yellowish. The smell of the bread was terrible just as the lid was taken. You need to cover your nose and prevent smelling it. The kitchen ends up smelling too! Be aware!!!!

Saturday November 15, 2013.
Day 7
The bread showed many dramatic changes. It changed totally how it looked from the outside, and the outermost layer was completely different. The bubbly texture grew, and its bubbles got bigger. The bubbles grew a lot in the sides of the bowl. The two layers mentioned from the day before, got much bigger. The yellowish layer got very think and it got completely separated from the second layer, which is the white one. It can be seen that they yellowish layer is more liquid than the second layer. The sides of the bowl got even more covered by that paste. The odor of the bread is still disgusting. You need to cover yourself once again! If you do not cover your nose, be careful, yuuck! !

Sunday, November 17, 2013.
Day 8
There were no major changes presented in the bread. The only thing different was that the bubbles got more bigger, and that they seemed to have a strong and gluey texture. Some of the paste is still getting into the sides of the bowl, making it look dirty. The uppermost layer got more yellowish, and still looks very liquid. There is a tiny layer between the two major layers, and this one is white. It looks like wihte sand. The last layer is the layer which looks cream, and this one is made of paste, and it looks like sand too. The odor still sucks! Keep an air freshener in your kitchen!!


Monday November 18, 2013.
Day 9
The evening while, and after doing the feeding:
This is finally the day in which we started using unbleached flour!! Let me tell you folks, the starter has improves incredibly!! It has now a rougher texture and it is definitely more solid like. The color is no longer white, but brown, and the starter is a little bit more difficult to mix.

Saturday November 23, 2013
Day 14
The morning before doing the feeding:
Guess what?!? The starter has grown twice its previous size!!! It's incredible, we certainly weren't expecting that. It sort of has a spongy texture and a nice aroma, and bubbles have grown everywhere!! So far until now, this has been one of the most surprising days we've had making the starter. Look at the pictures and prepare to be amazed!!!


The morning after doing the feeding:

The evening while, and after doing the feeding:
The starter is very similar to the one on yesterday's night, but it is much more solid and brown. Finally, it looks like actual bread dough and not some strange gooey stuff. It has bubble formations and smells rather nice. We hope our bread will come out fine.

Sunday November 24, 2013.
Day 15 Baking Tiiiime!!!
Good morning folks, today will be the day we start the baking process!! YAY!! The process will be done from day 15 to day 16, and I assure you it will be fun. Again the starter grew twice its size, it was difficult for us to take it out of the oven (which was the place where we were storing it), some even fell out of the bowl! The color was more brownish and the odor as sweet as ever. Here is a nice picture:

 Kneading: It was very difficult to knead because the dough ball was huge and very hard, but when we finished kneading it it became much more flexible. Doesn't it look nice?
 Salt and final mix: After letting it rest for a while, putting on a little bit of
salt and kneading it once more, this is what we came up with. It's nice and
flexible and not so hard to manage. Finally, we have bread dough!
Salt and final mix: After letting it rest for a while, putting on a little bit of
salt and kneading it once more, this is what we came up with. It's nice and
flexible and not so hard to manage. Finally, we have bread dough!
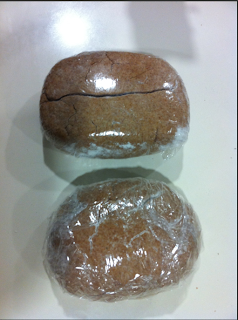
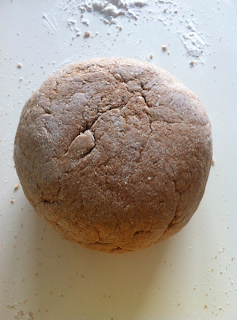
Fermenting and Shaping: We left the dough to ferment for a while in a bowl and then we took it out and shaped it into to nice balls! They are now covered in plastic so that we can put them in the refrigerator until tomorrow, when we will complete the baking process.
 Today
we continued to bake the bread, and we tell you people, this is the real shit!
Unfortunately, we couldn’t get the bread at the right time out of the
refrigerator, because people were fumigating our house, and so the maid didn’t
get the bread out when we asked her to. So instead of taking out the bread at
11:00 am, it was out of the refrigerator almost four hours later, at 3:00 pm.
So all of the yeast died and the bread didn’t grow. Yeah, so that’s nice, all
our hard work gone to waste because of the stupid fumigators. There was another
little problem, the bread wasn’t baked correctly, it was raw!! Instead of
putting the oven at 500˚F I put it in 232˚F because we thought our oven was in
Fahrenheit.
Today
we continued to bake the bread, and we tell you people, this is the real shit!
Unfortunately, we couldn’t get the bread at the right time out of the
refrigerator, because people were fumigating our house, and so the maid didn’t
get the bread out when we asked her to. So instead of taking out the bread at
11:00 am, it was out of the refrigerator almost four hours later, at 3:00 pm.
So all of the yeast died and the bread didn’t grow. Yeah, so that’s nice, all
our hard work gone to waste because of the stupid fumigators. There was another
little problem, the bread wasn’t baked correctly, it was raw!! Instead of
putting the oven at 500˚F I put it in 232˚F because we thought our oven was in
Fahrenheit.


Friday November 15, 2013.
Day 6
At the beginning of the day, the outermost layer of the bread was completely flat, without any bubbles. Then, in the afternoon some bubbles started to emerge and they started surrounding the dishcloth. At the end of the day it was completely bubbly, and a there seen two layers. The first layer was very tiny, barely seen, it was kind yellowish. The smell of the bread was terrible just as the lid was taken. You need to cover your nose and prevent smelling it. The kitchen ends up smelling too! Be aware!!!!

Saturday November 15, 2013.
Day 7
The bread showed many dramatic changes. It changed totally how it looked from the outside, and the outermost layer was completely different. The bubbly texture grew, and its bubbles got bigger. The bubbles grew a lot in the sides of the bowl. The two layers mentioned from the day before, got much bigger. The yellowish layer got very think and it got completely separated from the second layer, which is the white one. It can be seen that they yellowish layer is more liquid than the second layer. The sides of the bowl got even more covered by that paste. The odor of the bread is still disgusting. You need to cover yourself once again! If you do not cover your nose, be careful, yuuck! !

Sunday, November 17, 2013.
Day 8
There were no major changes presented in the bread. The only thing different was that the bubbles got more bigger, and that they seemed to have a strong and gluey texture. Some of the paste is still getting into the sides of the bowl, making it look dirty. The uppermost layer got more yellowish, and still looks very liquid. There is a tiny layer between the two major layers, and this one is white. It looks like wihte sand. The last layer is the layer which looks cream, and this one is made of paste, and it looks like sand too. The odor still sucks! Keep an air freshener in your kitchen!!


Monday November 18, 2013.
Day 9
The bread has had minimum changes. The yellowish layer has
gotten bigger, and it more transparent. The cloth has gotten more covered by the yeast
turning into a color like beige-yellowish. The only part of the cloth that is not dirty, and that
is white is at the top. The yeast has gotten all over the sides of the bowl making even
dirtier than it was before. The second layer still looks like it was sand with yeast. It has the
same color which is white. At the very top the bubbles has gotten like hard and big. It looks
like it has formed a a complete layer at the very top of the starter. Also, it seems that this
layer has gotten stronger and more thick.


Tuesday November 19, 2013.
Day 10
The morning while doing the feeding:


Tuesday November 19, 2013.
Day 10
The morning while doing the feeding:
The first step for the feeding was the worst thing I have done in my entire life. We
had to take out the dishcloth from the starter. This was disgusting and the starter was
falling all over the place. Yet, the worst part was when we had to squeeze the grapes
inside the dishcloth. This was the worst and most horrible sensation I have ever lived. It
smelled like grapes, or grape juice. After separating the starter from the real thing we were
going to do, we had to put flour and water. After putting, and stirring these ingredients with
the starter, it’s composition changed completely. It was no longer liquid, now, it was thick.
Now it did look like a real bread. Also, its odor changed. It no longer smelled that bad, it
started to smell like alcohol. This was just the beginning of the feeding, and it is hoped that
the breads ends up amazing! !


The evening, after 8-12 hours, before evening’s feeding:
After 8-12 hours of the morning’s feeding, the bread changed a lot. It grew dramatically, it looked like it was going to fall out the bowl. Its size grew like three times since we looked at it during the morning. Now the mass did look like it was very thick and that it was impossible getting something inside it. The bubbles that formed here were very different from those at the very beginning. This ones had were not that thick, and this ones were smaller. The smell was the same since the feeding of the morning.

The evening while, and after doing the feeding:
We had to put flour and water again to the starter. This made the mass lower down
preventing it from getting out of the bowl. It ended up exactly the same as it was at the end
of the feeding of the morning. It was like a mass, and very thick. Some bubbles formed
from the mixture, but these were very small and they were barely seen. The texture was
the same one as the one of the morning’s feeding. The odor was the same one, it still
smelled like alcohol. After this, we had to close it, and wait until the morning to see how it
looks after the first day of feeding. If you wanna see, keep your self posted, do not leave
us!!

Wednesday November 20, 2013.
Day 11
The morning while doing the feeding:
Today we did another feeding, and it was so horrible we were about to throw up! The starter was all gooey, it didn't have any prominent layers, and guess what!? It no longer smelled like garbage but it smelled like wine!! Talk about a change. In the morning, we combined 2 cups of starter into a clean container. And discard the rest of the starter and then we added 3 cups water and 4 cups of flour. This caused the starter to grow, and its mass doubled!! It stayed somewhat liquid, although it should have been more solid.


Thursday November 21, 2013.
Day 12
The morning while doing the feeding:
After 8-12 hours of the morning’s feeding, the bread changed a lot. It grew dramatically, it looked like it was going to fall out the bowl. Its size grew like three times since we looked at it during the morning. Now the mass did look like it was very thick and that it was impossible getting something inside it. The bubbles that formed here were very different from those at the very beginning. This ones had were not that thick, and this ones were smaller. The smell was the same since the feeding of the morning.

The evening while, and after doing the feeding:

Wednesday November 20, 2013.
Day 11
The morning while doing the feeding:
Today we did another feeding, and it was so horrible we were about to throw up! The starter was all gooey, it didn't have any prominent layers, and guess what!? It no longer smelled like garbage but it smelled like wine!! Talk about a change. In the morning, we combined 2 cups of starter into a clean container. And discard the rest of the starter and then we added 3 cups water and 4 cups of flour. This caused the starter to grow, and its mass doubled!! It stayed somewhat liquid, although it should have been more solid.


The evening while, and after doing the feeding:
In the evening, like 8-12 hours after the morning feeding of the starter. I removed the containers lid. Then added four cups of
water and 5 of flour, and then mixed it. Thanks to the amount of flour added the starter became much more solid than in the morning. Its size had also grown a little.

Thursday November 21, 2013.
Day 12
The morning while doing the feeding:
In the morning no more than 15 hours after the last bread
feeding.
Combine 2 cups of starter into a clean container. Discard the rest of the starter. The starter developed some bubbles overnight and does not smell as terrible as before. The color is still the same, mostly because we are using normal flour instead of the unbleached one (because we don't have any). There haven't been much changes since the last feeding.

The evening while, and after doing the feeding:
No comments here, its the same thing. :)

Friday November 22, 2013.
Day 13
The morning while doing the feeding:
The starter doesn't smell anymore, thank God!!! It is a little more solid than before, although right now it should be even more solid. That's probably because of the flour. The starter still has a white color and a creamy texture, but it's definitely not fun to touch with your hands. Yuck!!! Here are some pictures:

This is finally the day in which we started using unbleached flour!! Let me tell you folks, the starter has improves incredibly!! It has now a rougher texture and it is definitely more solid like. The color is no longer white, but brown, and the starter is a little bit more difficult to mix.

Saturday November 23, 2013
Day 14
The morning before doing the feeding:
Guess what?!? The starter has grown twice its previous size!!! It's incredible, we certainly weren't expecting that. It sort of has a spongy texture and a nice aroma, and bubbles have grown everywhere!! So far until now, this has been one of the most surprising days we've had making the starter. Look at the pictures and prepare to be amazed!!!


The morning after doing the feeding:

The evening while, and after doing the feeding:
The starter is very similar to the one on yesterday's night, but it is much more solid and brown. Finally, it looks like actual bread dough and not some strange gooey stuff. It has bubble formations and smells rather nice. We hope our bread will come out fine.

Sunday November 24, 2013.
Day 15 Baking Tiiiime!!!
Good morning folks, today will be the day we start the baking process!! YAY!! The process will be done from day 15 to day 16, and I assure you it will be fun. Again the starter grew twice its size, it was difficult for us to take it out of the oven (which was the place where we were storing it), some even fell out of the bowl! The color was more brownish and the odor as sweet as ever. Here is a nice picture:


 Salt and final mix: After letting it rest for a while, putting on a little bit of
salt and kneading it once more, this is what we came up with. It's nice and
flexible and not so hard to manage. Finally, we have bread dough!
Salt and final mix: After letting it rest for a while, putting on a little bit of
salt and kneading it once more, this is what we came up with. It's nice and
flexible and not so hard to manage. Finally, we have bread dough!
Fermenting and Shaping: We left the dough to ferment for a while in a bowl and then we took it out and shaped it into to nice balls! They are now covered in plastic so that we can put them in the refrigerator until tomorrow, when we will complete the baking process.
Monday
November 25, 2013.
Day 16 Baking
Tiiiime Part 2
 Today
we continued to bake the bread, and we tell you people, this is the real shit!
Unfortunately, we couldn’t get the bread at the right time out of the
refrigerator, because people were fumigating our house, and so the maid didn’t
get the bread out when we asked her to. So instead of taking out the bread at
11:00 am, it was out of the refrigerator almost four hours later, at 3:00 pm.
So all of the yeast died and the bread didn’t grow. Yeah, so that’s nice, all
our hard work gone to waste because of the stupid fumigators. There was another
little problem, the bread wasn’t baked correctly, it was raw!! Instead of
putting the oven at 500˚F I put it in 232˚F because we thought our oven was in
Fahrenheit.
Today
we continued to bake the bread, and we tell you people, this is the real shit!
Unfortunately, we couldn’t get the bread at the right time out of the
refrigerator, because people were fumigating our house, and so the maid didn’t
get the bread out when we asked her to. So instead of taking out the bread at
11:00 am, it was out of the refrigerator almost four hours later, at 3:00 pm.
So all of the yeast died and the bread didn’t grow. Yeah, so that’s nice, all
our hard work gone to waste because of the stupid fumigators. There was another
little problem, the bread wasn’t baked correctly, it was raw!! Instead of
putting the oven at 500˚F I put it in 232˚F because we thought our oven was in
Fahrenheit.
OUR
LIVES ARE MISERABLE!!!!! All of hard work gone to waste!! We put so much effort
and so much love into this! Into every feeding we made, every hour, every
minute, every second we cared for hour bread all gone to waste! What a cruel
life!!! We cannot believe we bought and wasted all that flour and starter to
make something that was not edible, not even pretty!! It was not even the right
color, the bread turned out black!! We even named it THE NIGGER BREAD. We are
so sad that we will even make a funeral. We can’t believe that we, who are such
professional cooks, would have ended with such a big piece of radioactive fecal
matter.
The
Nigger Bread tastes horrible!!! It’s rough and has a flavor that makes you gag.
It smells horrible, YUCK! And it’s even harder than a brick, we swear that if
we hit someone with it, the person would either turn out dead or with internal
bleeding. Folks, we severely advise you, if your bread turned out as horrible
as ours, guard it and use it to kill your enemies, its quite effective.
After
two weeks of hard labor, terrible garbage smells, yucky starters and constant
feedings, our bread turned out even more horrible than the Adam’s family. But
as the saying goes, we all must learn from our mistakes. Next time, our bread
will be perfect! *inserts shiny stars
and tears of happiness*. Bullshit, we ain’t doing this again. But folks,
you all have the choice to try any of the recipes that we included in our blog,
and even attempt to make the sourdough bread. Or not. Anyways, baking our bread
did teach us a very valuable lesson: the difficulty through which our
ancestors, who had no electricity, had to go through to make a single, stupid
loaf of bread to feed themselves. So yeah, now we understand what you people
(the ancestors) have gone through. Here have a cookie. Sadly, this is our last
blog post ever, and we hope with all our heart and soul that you have enjoyed
this as much as we have, and we thank you for accompanying us in this hard
journey. Thank you folks, for sticking to our blog. WE LOVE YOU <3.
Goodbye
Motherfuckahs!!! Have a nice life ;)

No hay comentarios:
Publicar un comentario